How Lost-Wax Casting Works with 3D Printing: A Jeweler's Guide
What is lost-wax casting
Where 3D printing fits into the lost-wax workflow
Hand-carved vs 3D printed wax patterns
What to look for in a jewelry wax 3D printer
Materials: red wax vs support wax
Resin (SLA/DLP) vs multi-jet wax printing
Bringing wax printing in-house vs outsourcing
What is lost-wax casting
Lost-wax casting is the process jewelers have used for centuries to turn a design into a finished metal piece.
A model of the piece is made in wax, surrounded with an investment material (a plaster-like mold compound), then heated until the wax melts and burns away "lost" leaving a hollow cavity in the exact shape of the design. Molten metal is poured into that cavity, and once it cools, the mold is broken away to reveal the cast piece. It's precise, repeatable, and still the backbone of most fine jewelry production today. The one thing that's changed dramatically in recent years is how that original wax model gets made.
Where 3D printing fits into the lost-wax workflow
Traditionally, that first step of carving the wax model was entirely manual. Today, most workshops start the process digitally instead. The typical workflow looks like this:
-
CAD design
The piece is designed in jewelry CAD software (RhinoGold, Matrix, or similar)
-
3D printed wax pattern
The digital file is sent straight to a wax 3D printer, which builds the physical wax model layer by layer instead of hand carving it
-
Investment
The printed wax pattern is invested in mold compound, exactly as a hand-carved one would be
-
Burnout
The mold is heated, the wax melts and burns out, leaving the casting cavity
-
Cast
Molten metal is poured, cooled, and the final piece is released from the mold
The casting side of the process doesn't change at all. What changes is speed, repeatability, and how much design complexity you can realistically produce.
Hand-carved vs 3D printed wax patterns
Hand-carving a wax model is a genuine craft skill, and for one-off, highly sculptural pieces it's still unmatched in some workshops. But it has real limits: it's slow, it's difficult to reproduce identically, and there's a practical ceiling on how fine or intricate a detail a carver can cut by hand.
3D printed wax patterns solve for exactly those limits:
-
Speed
A pattern that might take hours to hand-carve can print in a fraction of the time, and multiple patterns can print in a single run
-
Repeatability
The same file produces the same pattern every time, which matters enormously for batch production or replacing a lost piece exactly
-
Complexity
Micro-pavé settings, filigree, and intricate stone-in-place designs that would be extremely difficult to hand-carve are straightforward for a high-resolution printer
What you trade for that speed and precision is the up-front step of learning CAD design but for most modern workshops, that's already part of the job.
What to look for in a jewelry wax 3D printer
Not all wax printers are built the same, and the specs actually matter for casting quality. The main things to evaluate:
-
Resolution (DPI) and layer thickness
This determines surface smoothness and how much fine detail the printer can hold.
Higher DPI and thinner layers mean less hand-finishing before casting.
-
Dimensional accuracy
Usually expressed as a tolerance over a given distance (for example, ±0.04 mm per 20 mm).
This is what determines whether a printed ring band will actually fit the size it was designed for.
-
Material utilization rate
How efficiently the printer uses wax versus wasting it on supports.
A higher utilization rate means less wax waste and shorter dewaxing time.
-
Support structure design
Supports need to hold the model during printing but also need to come away cleanly without damaging fine details.
Honeycomb-style support structures are designed specifically to reduce wax use and simplify removal.
-
Build volume vs footprint
How many pieces you can print per run, balanced against how much bench or floor space the machine actually needs.
The Flashforge WaxJet 51C, for example, prints at 2900 × 2900 × 1700 DPI with a 15 μm layer thickness and ±0.04 mm/20 mm dimensional accuracy (resolution built specifically for micro-pavé and filigree work) while keeping material utilization at 57% or higher through an honeycomb support structure. See the full spec sheet →
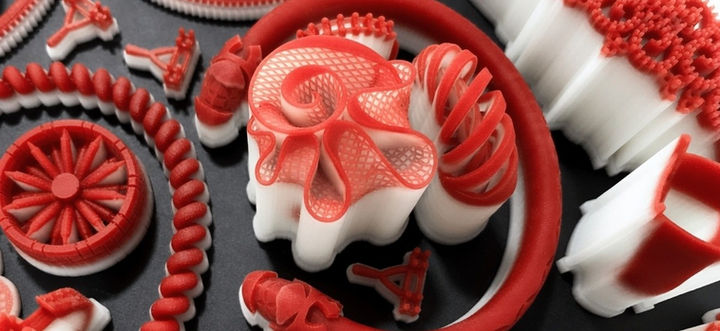
Materials: Red wax vs Support wax
Jewelry wax printers typically use two materials in the same print job:
-
Model (build) wax
Usually a red, structural wax formulated for high tensile strength, since this becomes the actual casting pattern
-
Support wax
A separate, dissolvable white wax used only to hold overhangs and fine details in place during printing, then removed before investment
Using two purpose-built materials rather than one general-purpose wax is part of what makes the finished pattern strong enough to survive investment and burnout without warping or breaking. See our consumables range
Resin (SLA/DLP) vs multi-jet wax printing
If you've looked into digital pattern-making before, there's a good chance you've come across SLA or DLP resin printers loaded with "castable" resin as well as wax printers like the WaxJet. They're not the same thing, and the difference shows up most clearly once a pattern reaches the casting room:
-
Ash and incomplete burnout
Standard resin leaves heavy carbon ash behind that can ruin the surface of the metal; purpose-built "castable" resins reduce this but don't eliminate it, and a clean burn depends on carefully following a specific kiln schedule. Genuine jettable wax burns out the same way traditional carved wax always has, because it is wax there's no carbon chain to manage.
-
Investment cracking during burnout
Wax softens and melts gradually; resin stays rigid, expands, then decomposes in a rapid burst of gas. Treated like wax in the kiln, that expansion can crack the mold before it's had a chance to fill. Avoiding it means a slower, more conservative burnout ramp than a traditional wax schedule allows. A wax pattern expands and melts the way investment material has always been designed to accommodate, so the burnout schedule your workshop already trusts doesn't need to change.
-
Post-processing time
A resin print needs support removal, an isopropyl alcohol wash to strip uncured resin, then a UV post-cure cycle timed carefully to avoid a part that's either tacky (under-cured) or brittle (over-cured). A jetted wax pattern is fully solid the moment it leaves the build plate without UV cure step. The support structure still needs to come off, but that's a warm solvent bath that dissolves the support wax in a few minutes, not a wash-then-cure sequence.
-
Support prep
SLA/DLP jobs need supports designed and placed in slicer software before printing, which takes real prep time and some experience to get right. Multi-jet wax printers generate support wax automatically as part of the print itself, so there's no separate manual support-design step per job.
-
Fragile detail
Cured resin is inherently brittle, and fine prongs or thin filigree wire can snap during support removal or handling. Jetted wax behaves like the hand-carved wax jewelers have always worked with which is flexible enough to survive normal handling.
-
Handling and disposal
Uncured resin is a known skin and respiratory irritant, and waste resin generally needs to be treated as hazardous waste. Casting wax carries none of that overhead; it's the same material jewelers have safely worked with by hand for generations.
To be fair to resin: for rough prototyping, sizing checks, or design proofs that never touch a kiln, an SLA or DLP printer is a perfectly reasonable, low-cost tool to have on the bench. The friction shows up specifically once a resin pattern is pushed through investment and burnout, a job real wax was already suited to. Multi-jet wax printing just brings that same trusted material into a digital, repeatable workflow.
Common use cases
3D printed wax patterns show up across nearly every corner of modern jewelry production:
-
Micro-pavé and filigree
Fine detail work that's difficult or impossible to hand-carve consistently
-
Stone-in-place casting
Printing wax patterns designed to cast around stones already positioned in the mold
-
Custom and bespoke pieces
One-off commissions where a digital file can be produced and iterated quickly before committing to metal
-
Mass customization
The same base design personalized (engraving, sizing, minor variations) and printed in batches without re-carving from scratch

Bringing wax printing in-house vs outsourcing to a bureau
Many workshops start out sending their wax patterns to an outside casting bureau, and for very high-volume production that can still make sense. But it comes with trade-offs: turnaround time, less control over the final pattern quality, and per-piece costs that add up over a year of steady work.
Bringing wax printing in-house changes that equation - you print same-day, iterate on the spot, and keep full control over the run. The trade-off is the up-front investment in a printer suited to your workshop's scale.
For a closer look at how a desktop machine compares to bureau-scale industrial printers, see our WaxJet 51C vs 3D Systems comparison.

Cost and ROI of bringing wax printing in-house
For a workshop currently outsourcing to a casting bureau, the in-house decision usually comes down to volume and turnaround needs rather than pure cost-per-piece. A few things worth weighing:
-
Per-piece bureau costs add up.
Even a modest per-pattern bureau fee compounds significantly over a year of steady production, especially for workshops doing frequent one-off or custom commissions.
-
Turnaround time has a real cost.
Waiting on a bureau to return a pattern (and waiting again if a revision is needed) slows down the whole design-to-sale cycle.
An in-house printer collapses that iteration loop to same-day.
-
Upfront investment is the trade-off.
A desktop wax printer represents a real capital cost, but one that's typically recovered over time through eliminated bureau fees, especially for workshops printing custom or one-off pieces regularly rather than in a single large batch.
-
Factor in consumables and maintenance
not just the printer price, when comparing the true cost of ownership against bureau fees.
Wax, support material, and routine servicing are ongoing costs either way.
FAQ
What is a wax 3D printer used for?
A wax 3D printer is used to produce casting patterns for lost-wax (investment) casting - most commonly in jewelry, but also in dental, foundry, and precision manufacturing applications. It replaces hand-carving the wax model with a printed one built directly from a CAD file.
How accurate is 3D printed wax casting?
Modern jewelry wax printers can hold dimensional accuracy as tight as ±0.04 mm per 20 mm, with layer thicknesses down to around 15 μm. That level of precision supports fine detail work like micro-pavé settings and filigree that would be very difficult to reproduce consistently by hand.
Can you 3D print directly in wax?
Yes. Purpose-built wax 3D printers use a jettable, castable wax material (not a wax-like resin) so the printed pattern behaves exactly like a traditional hand-carved wax model during investment and burnout.
What's the difference between resin and wax jet printing for casting?
SLA and DLP printers cure a liquid plastic resin, layer by layer, using light. Even "castable" resins are an approximation of wax, they need a carefully managed burnout schedule to avoid cracking the investment and can leave ash behind. Multi-jet (wax jet) printers instead jet genuine casting wax directly, so the printed pattern behaves exactly like a traditional hand-carved wax model in the kiln, with a standard burnout schedule and no ash-management step.
Can I use my existing SLA/DLP resin printer for casting patterns?
You can, and many workshops do for rough prototyping or sizing checks. For patterns that go through investment and burnout, though, it comes with real trade-offs - a slower, more conservative burnout schedule to avoid cracked molds, extra post-processing and more fragile detail during handling. A wax printer avoids those trade-offs by printing with the same material the casting process was already built around.
How much wax waste does 3D printing save vs hand-carving?
It depends on the printer's support structure design, but printers with efficient support geometry (honeycomb structures, for example) can reach material utilization rates of 57% or higher, meaning less wax is used per print, dewaxing takes less time, and less solvent is needed for cleanup compared to less efficient support designs.
Does 3D printed wax cast the same as hand-carved wax?
Yes, provided the printer uses a genuine casting wax material rather than a general-purpose resin. A properly formulated printed wax pattern burns out cleanly and casts with the same result as a traditional hand-carved model, the casting process itself doesn't need to change.
What CAD software works with jewelry wax printers?
Most jewelry-specific CAD packages (RhinoGold, Matrix, JewelCAD, and similar) export standard STL or similar mesh files that jewelry wax printers accept directly, so there's typically no need to change your existing design software to move to 3D printed patterns.
How long does it take to print a wax pattern?
Print time depends on the model's height, complexity, and how many pieces are printed in the same batch. A single ring pattern is typically a matter of hours, and printing several patterns together in one run is usually far more time-efficient per piece than printing one at a time.
Do I need special training to run a wax 3D printer?
Basic operation is generally straightforward for anyone comfortable with jewelry CAD workflows, though getting consistent results with fine detail work (micro-pavé, thin filigree) benefits from some hands-on training. Most suppliers, including 3D Werk, include setup and training as part of the purchase.
Have questions about bringing wax 3D printing into your own workshop? Get in touch or Request some print samples.